

If you frequently use Microsoft Outlook, you might be unable to open OST or PST files because their size exceeds the limit. This can be frustrating, especially if you use Outlook to manage your emails and other important documents.
For Microsoft Outlook 2003, and 2007, the default recommended maximum Outlook OST/PST file size is 20 GB. For Outlook 2002 and earlier, the recommended default maximum Outlook PST/OST file size is 2 GB. In the latest versions like Outlook 2010, 2013, 2016, 2019, 365, and 2021, the recommended default maximum size of OST/PST file is 50 GB.
Outlook is a popular email client that allows users to manage their emails, contacts, and events in real-time. OST files are offline folder files that store a copy of Exchange mailbox files on your local computer. The OST/PST file size limit in Outlook is 50 GB, you can increase the OST/PST file size if you are short of space. This article shows you how to increase OST and PST file size in Outlook.
Reasons to increase OST or PST File size
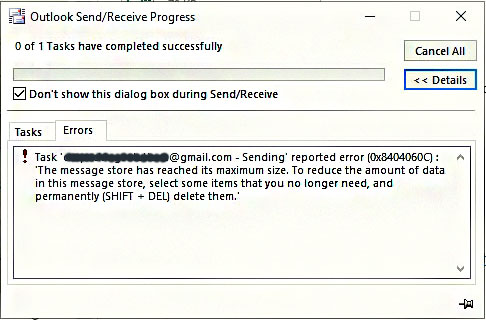
If you are an Outlook user, you will see the error message “Message storage has reached its maximum size“. This error can be annoying, especially if you cannot access Outlook mail. It becomes necessary to increase the size of the PST File when its default size limit is exceeded. One of the reasons that may increase OST file size is Outlook errors like:
“Task abc@gmail.com – Sending’ reported error (0x840XXXXX): ‘The message store has reached its maximum size. To reduce the amount of data in this message store, select some items that you no longer need, and permanently (SHIFT + DEL) delete them.'”

Important Note: It is not recommended if you have an OST file larger than 50 GB or if you open a PST file larger than 50 GB as it may damage your Outlook profile. If your OST file has reached the limit, you may want to consider reducing the size of the OST file instead of increasing the file size limit. However, you may need to do this temporarily to upload the data from the .pst file to the server. Instructions for this can be found below.
How to increase OST or PST File size
There are several situations where you, may need to increase the Outlook PST file size limit beyond the default size available. If you receive many emails a day with larger attachments, you may be experiencing size limit issues. In this blog, you’ll see how to use registry entries and group policy to configure size limits for (.pst) and (.ost) files in Outlook.
1: Increase Outlook File Size using Registry Editor
Registry keys are created when Outlook or other applications are installed on Windows. You can change the behavior or functionality of Outlook by changing registry keys. Similarly, you can increase the OST file size by creating new registry keys or files. The steps are as follows:
This article explains how to increase the Outlook data file size using the Outlook registry. The following four registry entries can help reduce the size of Outlook .pst and .ost files.
- The MaxFileSize registry entry
- The WarnFileSize registry entry
- The MaxLargeFileSize registry entry
- The WarnLargeFileSize registry entry
The MaxFileSize registry entry: The MaxFileSize registry entry defines the absolute maximum size that PST and OST files can reach. Once this maximum size is reached, Outlook will not allow the file size to exceed this size.
The WarnFileSize registry entry: The WarnFileSize registry entry defines the maximum amount of data that PST and OST files can contain. After the maximum data size is reached, no more data can be added to the .pst or .ost file. However, internal processes can cause the actual file size to continue to grow.
The MaxLargeFileSize registry entry: This registry can be used to set the maximum size to which Outlook PST files can be expanded (for Unicode-type PST files).
WarnLargeFileSize: You can use this registry entry to set the maximum data allowed in Outlook PST files (PST files in Unicode format).
Steps to Increase Outlook Data File Size Limit
You will notice that as your mailbox grows, so does your PST file. This can be problematic when you reach the pre-configured size limit in Outlook. However, if you want to increase the maximum size of your PST file using Registry Editor, follow these steps:
- Press the Windows + R keys to open the Run box.
- Type the
regeditand press OK. This opens the Registry Editor window. - In Registry Editor, navigate to the following location, depending on your version of Outlook:
| 1 | Microsoft Outlook 2003 | HKEY_CURRENT_USER\Software\Microsoft\Office\11.0\Outlook\PST |
| 2 | Microsoft Outlook 2007 | HKEY_CURRENT_USER\Software\Microsoft\Office\12.0\Outlook\PST |
| 3 | Microsoft Outlook 2010 | HKEY_CURRENT_USER\Software\Microsoft\Office\14.0\Outlook\PST |
| 4 | Microsoft Outlook 2013 | HKEY_CURRENT_USER\Software\Microsoft\Office\15.0\Outlook\PST |
| 5 | Microsoft Outlook 2016 and Later | HKEY_CURRENT_USER\Software\Microsoft\Office\16.0\Outlook\PST |
| 6 | Outlook 365 | HKEY_CURRENT_USER\Software\Microsoft\Office\16.0\Outlook\PST |
- Right-click on the PST folder choose New > DWORD (32-bit) Values and create two values:
- WarnLargeFileSize with value 50904450.
- MaxLargeFileSzie with value 52949672.
- For example, to set the maximum size to 100 GB set the value to “100000000000”.
- Restart Outlook for the changes to take effect.
Also Read:-
- How to Manually configure Outlook 2010
- How to convert any document file into a pdf
- How to make a Windows 7 bootable pen drive
2: Increase OST/PST File Size via Group Policies (GPO)
One of the best ways to control Outlook OST file size is to use Group Policy. The Policy group allows you to configure many settings for Outlook, including the cached mode slider, location, and synchronization options. Group Policy allows you to apply the same settings to multiple users and computers in a domain and maintain consistency. To manage Outlook OST file size using Group Policy, you must download and install Group Policy for your version of Office.
This method is advanced and should only be used by Exchange administrators. Users can ask the administrator to increase the size of the OST file. To increase the size of the OST file on Group Policy, follow these steps:
- Open the Group Policy Management Console (GPMC) on your domain controller.
- In the Group Policy Management Editor, navigate to the following path.
User Configuration > Administrative Templates > Microsoft Outlook [version] > Miscellaneous > PST Settings- Once expended the above location, make the following changes:
- Set Large PST: Absolute maximum size. And enter value 4294967295.
- Set Large PST: Size to disable adding new content to 4090445042. (It should be lower than the Large PST: Absolute maximum size value.)
After the changes are complete, users can reboot the system for the changes to take effect. However, it may take some time for the changes to appear in Outlook.
Conclusion
So, as you have read, configuring Outlook file size limit via registry is not a complicated task. However, it always requires a little care and some technical expertise. Setting the value beyond the limit may lead to corruption of the PST file. For users facing PST corruption or PST issues after trying this method, try to get assistance from an expert service provider like SAS Techvision.