• About
  • Help
  • Feedback
  • Contact
Thursday, August 18, 2022
Computer AMC Services
No Result
View All Result
  • Home
  • SAS Techvision’s Profile
  • Tips & Tricks
    • All
    • DSC Error
    • iball Compbook
    • Microsoft Outlook
    • Windows
    How to check TPM 2.0 for windows 11

    How to check TPM 2.0 for windows 11

    IMAP Add Your Gmail Account to Outlook 2010 Using

    Add Your Gmail Account to Outlook 2010 Using IMAP

    How to Manually configure Outlook 2010

    How to Manually configure Outlook 2010

    How to Reset Windows 10 in iBall Compbook i360 v3.0

    Error in establishing connection with TRACES Websocket Esigner on TRACES Solved

    Error in establishing connection with TRACES Websocket Esigner on TRACES (Solved)

    Trending Tags

    • Visit Bali
  • Education
  • Contact
No Result
View All Result
Computer AMC Services
No Result
View All Result
Home All Articles Microsoft Outlook

How to Manually configure Outlook 2010

SAS Techvision by SAS Techvision
June 30, 2022
in Microsoft Outlook
0
How to Manually configure Outlook 2010

How to Configure Manually configure Outlook 2010

1. Open Outlook 2010.

2. Click File, and then Add Account. See Figure 1 below.

https://mediatemple.zendesk.com/hc/article_attachments/202379320/Outlook_Add_Account.jpg 
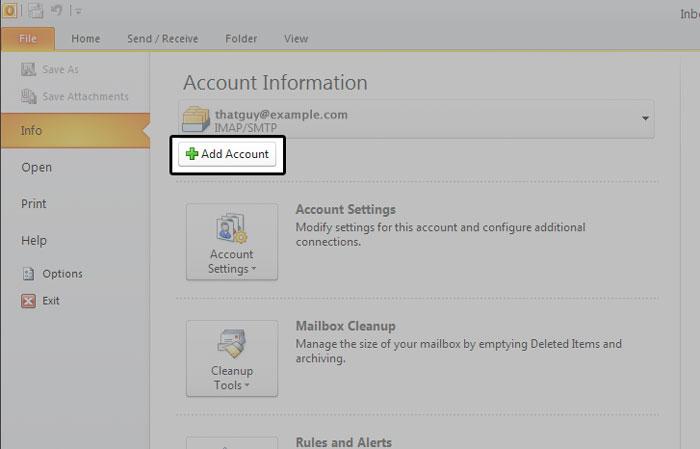
Figure 1: Click the “+Add Account” button to begin.

3. Next, select Manually configure server settings or additional server types, then click next. See Figure 2 below.

https://mediatemple.zendesk.com/hc/article_attachments/202347834/Outlook_Configure.jpg 
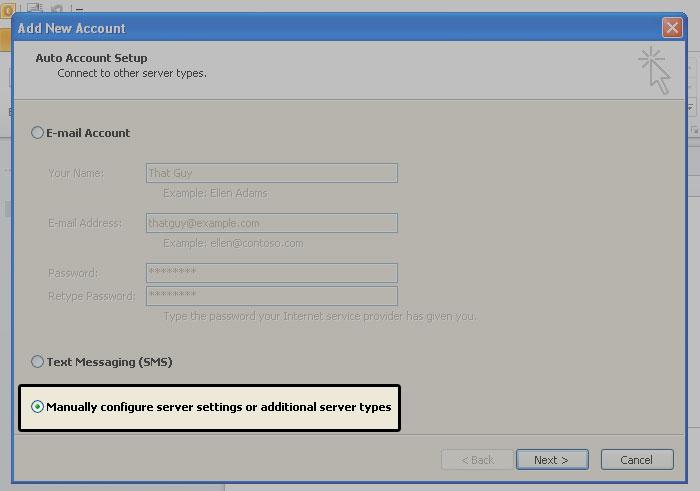
Figure 2: This will allow you to enter your account information.

4. In this screen, choose Internet E-mail, then click Next. Figure 3 below illustrates this window.

https://mediatemple.zendesk.com/hc/article_attachments/202347894/Outlook_Internet_E_mail.jpg 
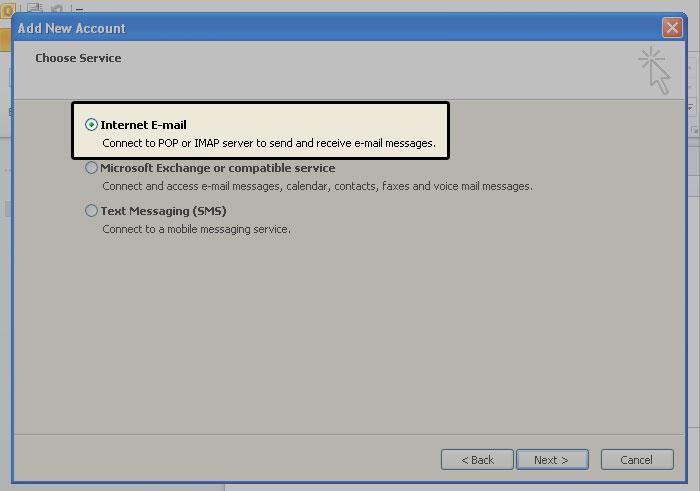
Figure 3: Be sure to select “Internet E-mail” then click the “Next” button.

5. This window is where you enter your email information, see Figure 4 below.

 https://mediatemple.zendesk.com/hc/article_attachments/202348034/Outlook_DV_Settings.jpg
Figure 4: Enter your email account information in this window.

  • Enter Your Name as you want it to appear.
  • Enter your full email address [email protected] in the Email address: field.
  • Select POP3 or IMAP. Learn more about the differences here.
  • Enter mail.example.com in the Incoming mail (POP3, IMAP) server: field.
  • Enter mail.example.com in the Outgoing mail (SMTP) server: field. To avoid common authentication issues with Outlook, we strongly advise using SSL and port 465 for SMTP connections.
  • Enter your full email address, [email protected], in the User Name field.
  • Enter your email password in the Password: field.

6. Perform the following steps:

  • Click on More Settings… see Figure 5 for the location of this button.


https://mediatemple.zendesk.com/hc/article_attachments/202348174/Outlook_More_Settings_DV.jpg 
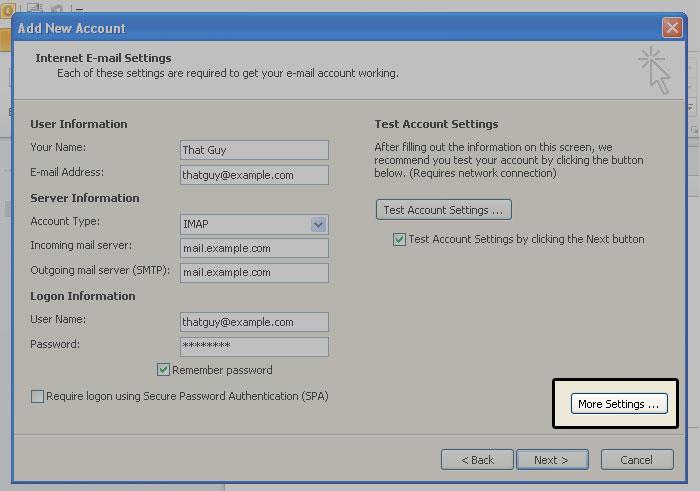
Figure 5: This will open a new window.

  • Click on the Outgoing Server tab. Check My outgoing server (SMTP) Requires Authentication. Make sure Use same setting as my incoming mail server is also checked. Click on OK. See Figure 6 as reference.

https://mediatemple.zendesk.com/hc/article_attachments/202379740/Outlook_More_Settings_02.jpg 
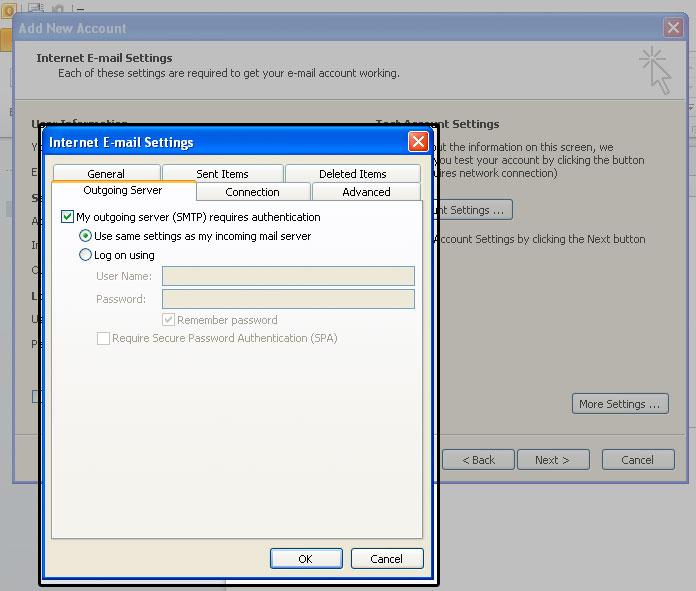
Figure 6: Be sure to confirm these settings.

7. Click the Test Account Settings button and you should see all items with green check marks… Click the Close Button to close the test window. 
Click OK to save your settings.

ShareTweetSend
SAS Techvision

SAS Techvision

Related Posts

IMAP Add Your Gmail Account to Outlook 2010 Using
Microsoft Outlook

Add Your Gmail Account to Outlook 2010 Using IMAP

June 30, 2022
Load More
Next Post
IMAP Add Your Gmail Account to Outlook 2010 Using

Add Your Gmail Account to Outlook 2010 Using IMAP

Leave a Reply Cancel reply

Your email address will not be published. Required fields are marked *

Popular News

  • Error in establishing connection with TRACES Websocket Esigner on TRACES Solved

    Error in establishing connection with TRACES Websocket Esigner on TRACES (Solved)

    0 shares
    Share 0 Tweet 0
  • The Credentials Supplied Are Not Sufficient To Access This Printer

    0 shares
    Share 0 Tweet 0
  • How to Reset Windows 10 in iBall Compbook i360 v3.0

    0 shares
    Share 0 Tweet 0
  • Solved: is not accessible. You might not have permission to use this network resource

    0 shares
    Share 0 Tweet 0
  • How to check TPM 2.0 for windows 11

    0 shares
    Share 0 Tweet 0

By Categories

  • DSC Error
  • iball Compbook
  • Microsoft Outlook
  • Uncategorized
  • Windows
Computer AMC Services

We are one of the best computer amc service provider in New Delhi. Being the best in our field means that we are committed to every project, we have ingenious ideas that become reality and we make every client happy. we have hundreds of satisfied Computer AMC Customers.

Recent Post

  • How to check TPM 2.0 for windows 11 June 29, 2022
  • Add Your Gmail Account to Outlook 2010 Using IMAP June 28, 2022
  • How to Manually configure Outlook 2010 June 28, 2022

Our Social Media

  • About
  • Help
  • Feedback
  • Contact

© 2015 SAS Techvision - One of The Best AMC Services Provider In Delhi & NCR

No Result
View All Result
  • Home
  • SAS Techvision’s Profile
  • Tips & Tricks
  • Education
  • Contact

© 2015 SAS Techvision - One of The Best AMC Services Provider In Delhi & NCR