
One of the best ways to fix software issues in Windows 11 is to perform a clean boot. Whether you’re experiencing crashes, slow performance, or malfunctions, a clean boot can help you identify and fix the underlying problem. In this article, you will learn what a clean boot is, how to perform it in Windows 11, and when to use it.
Performing a clean boot is an essential troubleshooting step for diagnosing and resolving various issues with your computer. Whether you’re experiencing system crashes, performance problems, or software conflicts, a clean boot can help you identify the root cause of the issue. This article will explore the concept of clean booting and provide a step-by-step guide for performing a clean boot on your Windows-based system.
What is a Clean Boot?
A clean boot is the process of starting your computer with a minimum of drivers and startup programs. This will help you isolate and identify software or driver conflicts that may be causing problems with your system. Unlike normal startup, clean boot prevents third-party applications and services from running during startup. You can fix the problem without being affected by unnecessary software.
When to Perform a Clean Boot?
A Clean Boot is particularly useful when you are encountering software issues that seem to be related to third-party applications or services. Common scenarios where a Clean Boot can be beneficial include:
- Frequent system crashes or BSOD (Blue Screen of Death) errors
- Unexplained slowdowns or performance issues
- Software applications crashing or freezing
- Difficulty in pinpointing the source of a system problem
- System crashes or freezes that occur when specific programs are running.
- Slow performance that improves in a Clean Boot environment.
- Application errors or crashes that do not occur in a Clean Boot.
Also Read:-
- How to Fix inaccessible boot device in Windows Server 2016
- How to fix the Inaccessible Boot Device Error in Windows 10/11
- Windows Host Process rundll32 has stopped working in Win 11/10
What is the difference between clean boot and safe mode?
Clean Boot and Safe Mode are two important tools for troubleshooting the Windows operating system. Both are used to diagnose and fix problems, but they work differently and use different methods.
Clean Boot:
A clean boot starts Windows using a minimum of drivers and startup programs. This will help you identify whether the conflict or problem is caused by a core Windows component or a third-party application. This can be especially helpful when you’re experiencing issues like random freezing, app crashes, or slow performance. To start a clean boot, users must modify their configuration by disabling non-essential startup items and services to allow diagnostics in a controlled environment.
Safe mode:
Safe mode is a diagnostic mode for your computer’s operating system. When Windows boots into Safe Mode, it downloads only important files and drivers needed to run the operating system, which can help resolve many problems including software conflicts, settings driver issues, and malware. Safe mode is often used when your computer frequently crashes or does not start properly. It provides a convenient place for troubleshooting, such as removing software or driver issues, running virus scans, and repairing system files.
What are the main differences between clean boot and safe mode?
- Clean Boot aims to isolate the root cause of problems related to third-party applications or services by selectively disabling non-essential startup items and services. This allows users to gradually re-enable these items one by one to troubleshoot and determine if a specific program or driver is causing the problem.
- Safe Mode, on the other hand, loads Windows with only the essential elements it needs to function properly from non-essential software and drivers, making it easier to diagnose and fix problems throughout the system.
- clean boot targets specific programs and services, providing a controlled environment to identify software conflicts or performance issues.
- while safe mode offers a more drastic approach by only loading essential components to troubleshoot systemic problems affecting the entire operating system.
It’s important to note that both clean boot and safe mode are not permanent solutions but rather tools to diagnose and mitigate issues.
Also Read:-
- Error 0x80070426 Resolved: Microsoft Store and Windows Update
- How to Fix Error Code 0xc0000017 in Windows 10
- Bypass Windows 11 Setup Without Internet and Microsoft Account
Performing a Clean Boot
Before you proceed, it’s crucial to back up your important data and ensure you have administrative privileges on the computer. Performing a Clean Boot on Windows 11 is a straightforward process. Here’s a step-by-step guide to executing a Clean Boot.
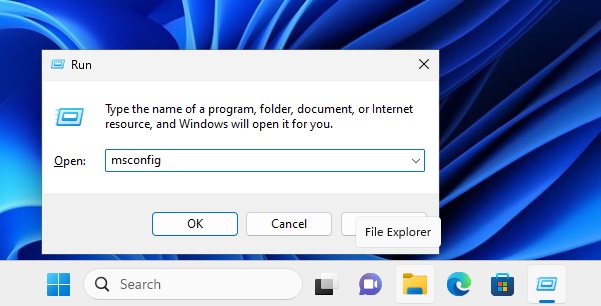
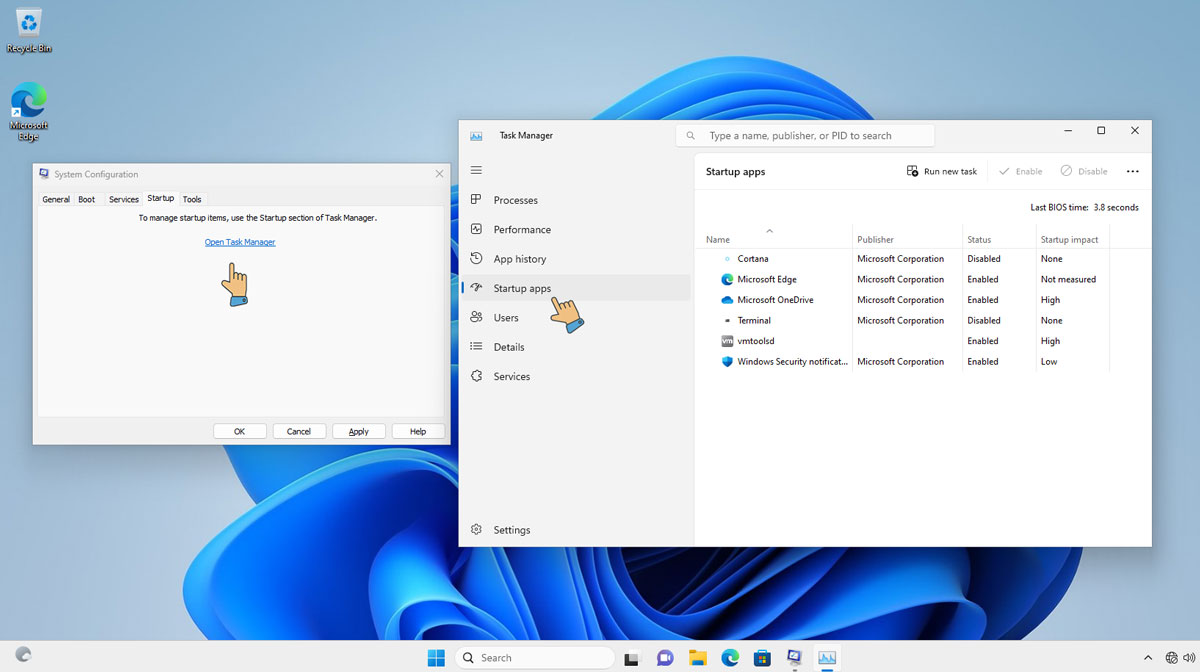
1: Open System Configuration
- Press the Windows key + R to open the Run dialog.
- Type “
msconfig” and press Enter to open the System Configuration utility.

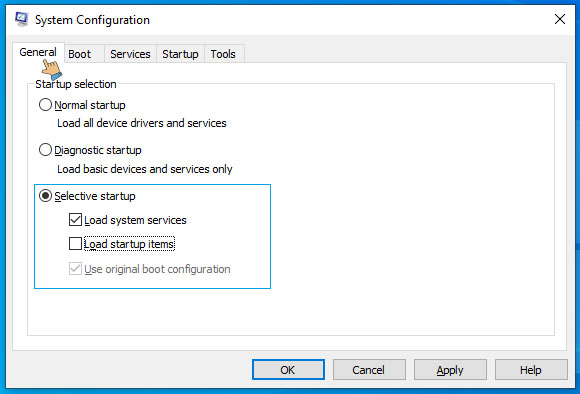
2: Perform a Clean Boot
- In the System Configuration window, go to the General tab
- Check the box next to Selective Startup.
- Remove the checkmark from Load startup items.

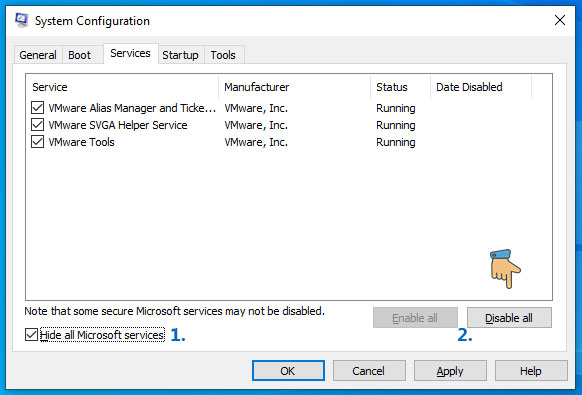
- Now navigate to the “Services” tab.
- Check the box that says “Hide all Microsoft services” to prevent essential Windows services from being disabled.
- Click “Disable all” to disable all non-Microsoft services.

- Next, go to the “Startup” tab and click “Open Task Manager.”
- In the Task Manager, disable all startup items by selecting each one and clicking “Disable.”

3: Restart Your Computer
After disabling non-essential services and startup programs, restart your computer to perform a clean boot. During the clean boot process, only essential Windows services and drivers will be running, allowing you to troubleshoot the issue without interference from third-party software.
Troubleshooting in Clean Boot State
Once your computer has restarted in a clean boot state, you can begin troubleshooting the issue at hand. You can gradually enable services and startup programs to pinpoint the problematic software or driver. This can be done by re-enabling services and startup items one by one and restarting the computer after each change. By observing the behavior of your system after each re-enablement, you can identify the specific service or program causing the issue.
Conclusion
Performing a clean boot is a valuable technique for troubleshooting various issues on your Windows-based system. By isolating software and driver conflicts, you can effectively diagnose and resolve system problems. Remember to create a system restore point before performing a clean boot to have a fallback option in case of any unforeseen issues. If you’re experiencing persistent issues with your computer, consider performing a clean boot to identify the root cause of the problem.